What is CryptKeeper?
Welcome to CryptKeeper browser extension, a simple, easy to use, and secure ZK identity and proof manager browser wallet.
![]()
Please note that this extension is currently in beta testing. It may not have full functionality or stability. Your participation and feedback will greatly assist us in refining and enhancing the extension.
💡 Overview
CryptKeeper is a browser extension that offers secure and private identity management and authentication solutions based on zero-knowledge proofs. The @cryptkeeperzk/providers package simplifies the integration of CryptKeeper functionality into applications by providing injected providers.
These injected providers allow applications to establish a connection with the CryptKeeper extension, enabling them to leverage its features and services. The package includes functions for initializing the CryptKeeper provider within the browser extension's InjectedScript and for connecting to CryptKeeper from an application.
✨ Features
-
Identity Secret and Identity Commitment Generation: Generate Semaphore identity secrets and commitments securely.
-
Seamless Connection with Semaphore Identity: Connect seamlessly with your Semaphore identity when interacting with websites and online services.
-
Semaphore Zero-Knowledge Proof (ZK-Proof) Generation: Generate Zero-Knowledge Proofs using the Semaphore library. ZK-Proofs enable you to validate the authenticity of data and assertions without revealing any sensitive information. This feature enhances privacy and security in various cryptographic applications.
-
Rate-Limiting Nullifier (RLN) Zero-Knowledge Proof (ZK-Proof) Generation: Generate Zero-Knowledge Proofs using the RLN JS library. RLN is a zk-gadget/protocol that enables spam prevention in anonymous environments.
Enabling Proof Generation:
Proof generation in the Semaphore library can be enabled in two ways:
-
Providing Merkle Witness Directly: You can generate a proof by directly providing the necessary Merkle witness. This allows you to use pre-computed witness data.
-
Using a Secure Service Address: by providing a secure service address from which the Merkle witness should be obtained
Guides
🛠 Contribution Guidelines
Welcome to our project! We appreciate your interest in contributing. This document provides detailed instructions on setting up the development environment, running the demo, and performing end-to-end testing.
Development Environment Setup
To get started with development, follow these steps:
-
Install pnpm: If you haven't already, make sure to install pnpm, which is our package manager of choice.
-
Install Project Dependencies: Run the following command to install the project's dependencies:
pnpm install
- Start the Development Build: Launch the development server with this command:
pnpm run dev
- Load Extension in Your Browser: Load the dist directory as an unpacked extension in your web browser.
Running the Demo
To run the project's demo, follow these steps:
-
Development Environment: Ensure you have set up the development environment as outlined above.
-
Build or Start the Demo: Choose one of the following options based on your preference:
- To build the demo, make sure you finished the setup steps.
- To start the merkle tree mock server, execute these commands:
pnpm run merkle:start- To start the demo, execute these commands:
pnpm run demo:start
End-to-End Testing
If you'd like to contribute by running end-to-end tests, follow these steps:
- Install Playwright Dependencies: Install Playwright dependencies for Chromium by running the following command:
pnpx playwright install --with-deps chromium
- Install Extension and Demo Dependencies: Make sure you have installed dependencies for both the extension and the demo:
pnpm install
-
Configure .env.test File:
- Create a
.env.testfile and set theMETAMASK_EXTENSION_ID. - You can find the
METAMASK_EXTENSION_IDin the log output when running the end-to-end testspnpm run e2e. Different environments may require differentMETAMASK_EXTENSION_IDvalues, so be sure to specify it explicitly.
- Create a
-
Build the Extension for Testing: Build the extension for end-to-end testing:
pnpm run build:e2e
- Run End-to-End Tests: Execute the following command to run Playwright end-to-end tests:
pnpm run e2e
Thank you for considering contributing to our project. We look forward to your valuable contributions!
🧩 Integrations
In order to connect your application with CryptKeeper Browser Extension, you would need to install CryptKeeper npm provider package. The @cryptkeeperzk/providers package simplifies the integration of CryptKeeper functionality into applications by providing injected providers.
These injected providers allow applications to establish a connection with the CryptKeeper extension, enabling them to leverage its features and services. The package includes functions for initializing the CryptKeeper provider within the browser extension's InjectedScript and for connecting to CryptKeeper from an application.
With the @cryptkeeperzk/providers package, developers can seamlessly integrate CryptKeeper functionality into their applications, enhancing security and privacy while benefiting from the features offered by CryptKeeper.
🔧 Installation
Install the package using your preferred package manager:
npm install @cryptkeeperzk/providers
📖 Usage
Inside an Application
To connect and communicate with CryptKeeper from an external application, use the cryptkeeperConnect function from @cryptkeeperzk/providers:
import { cryptkeeperConnect, type CryptKeeperInjectedProvider } from "@cryptkeeperzk/providers";

const client = await cryptkeeperConnect();
The cryptkeeperConnect function establishes a connection with CryptKeeper and returns a CryptKeeperInjectedProvider instance if CryptKeeper is installed, or undefined otherwise. You can await the function call to ensure the connection is established before proceeding with further operations.
🎯 Injected client
CryptKeeper injects a client object called cryptkeeper into the browser. This is similar to how MetaMask injects a global API into websites visited by its users at window.ethereum (formerly window.web3).
The injected client serves as bridge between frontend and backend processes. It is passed into the web page by the extension through an API allows the web page to make calls to CryptKeeper. From here you can manually generate and verify proofs, create identities, and set permissions.
You should be able to access the injected client’s functions and permissions once connected:
-
connect: Retrieves the currently active identity. -
getConnectedIdentity: Retrieves the connected identity. @src/contentscripts/injected.ts
// Example
const { name, urlOrigin } = await client.getConnectedIdentity()
getHostPermissions: Retrieves the permissions for the specified urlOrigin.setHostPermissions: Sets the permissions for the specified urlOrigin.createIdentity: Creates a new identity and returns the result.createDummyRequest: Creates a dummy request and returns the result.semaphoreProof: Sends a Semaphore proof request and returns the result.rlnProof: Sends a RLN proof request and returns the result.clearApproved: Clears the approved list of requests.getApproved: Retrieves the approved list of requests.openPopup: Opens the extension's popup window.closePopup: Closes the extension's popup window.post: Sends a request to the extension and returns the result.
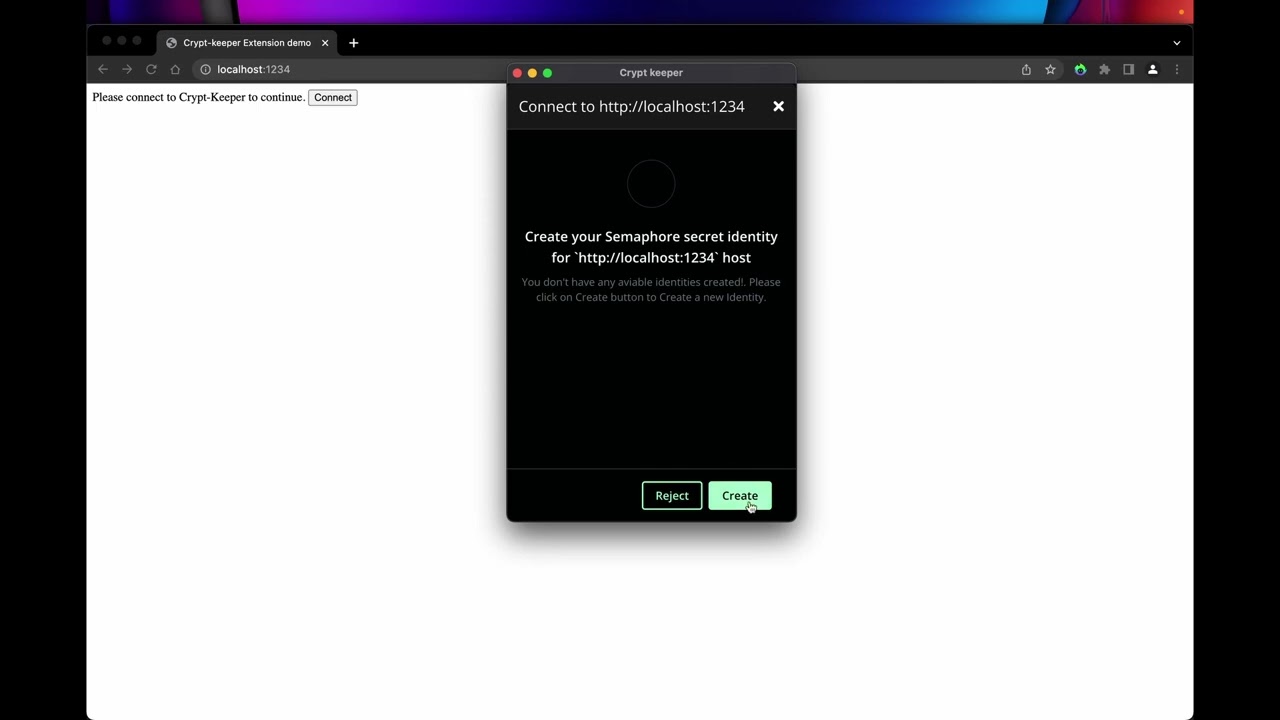
Connect
🆔 Create identity
By default, CryptKeeper uses either its supported internal ethereum wallet, or an external wallet like MetaMask (and still the only supported external wallet) to create a new Semaphore Identity.
- In CryptKeeper/MetaMask wallet, a user signs a message with the private key of their Ethereum account.
- In your DApp, the user creates a deterministic identity with the signed message.
- The user can now recreate their Semaphore identity whenever they want by signing the same message with their Ethereum account in CryptKeeper/MetaMask wallet.
@src/providers/sdk/CryptKeeperInjectedProvider.ts
  /**
   * Connects to an existing identity for the specified urlOrigin.
   *
   * @param {IConnectIdentityRequestArgs} urlOrigin - The urlOrigin for which to connect to an identity.
   * @returns {Promise<void>} A Promise that resolves when the connection is complete.
   */
  async connectIdentity({ urlOrigin }: IConnectIdentityRequestArgs): Promise<void> {
    await this.post({
      method: RPCAction.CONNECT_IDENTITY_REQUEST,
      payload: {
        urlOrigin,
      },
    });
  }
Usage
import { cryptkeeperConnect, type CryptKeeperInjectedProvider } from "@cryptkeeperzk/providers";

const client = await cryptkeeperConnect();
await client.connectIdentity();
cryptkeeper.getConnectedIdentity()
Retrieves the connected identity metadata.
@src/providers/sdk/CryptKeeperInjectedProvider.ts
/**
   * Retrieves the connected identity.
   *
   * @returns {Promise<IConnectedIdentity>} A Promise that resolves to the connected identity.
   */
  async getConnectedIdentity(): Promise<ConnectedIdentityMetadata | undefined> {
    return this.post({
      method: RPCAction.GET_CONNECTED_IDENTITY_DATA,
    }) as Promise<ConnectedIdentityMetadata>;
  }
Usage
import { cryptkeeperConnect, type CryptKeeperInjectedProvider } from "@cryptkeeperzk/providers";

const client = await cryptkeeperConnect();
const { name, urlOrigin } = await client.getConnectedIdentity();
📖 Resources
📼 Old Video Resources
YouTube: CryptKeeper Demo ()
YouTube: DevCon 6 "Crypt Keeper ZK Identity Wallet"
References
🤔 FAQ
description: Background information on relevant concepts
📘 Terms
Circuits
A circuit is a mathematical representation of the computations that need to be performed to prove a statement. A circuit consists of a set of wires that carry values (inputs) and connect them to addition and multiplication gates, which restrict specific operations on the inputs. The prover generates a proof, which is a succinct representation of the input and output of the circuit, and sends it to the verifier, who can then efficiently verify the proof without knowing the input values.
For more background information on how circuits work, check out this link: https://docs.circom.io/background/background/
Ready-to-use and audited circuit files can be found here and here.
Merkle Tree
A Merkle tree is a type of data structure used to efficiently verify the integrity of large data sets.
It is constructed by repeatedly hashing pairs of data until a single hash, called the root, is left. Each pair of child nodes in the tree is connected to its parent node by a hash link, and each leaf node in the tree contains a piece of the original data. When verifying the integrity of the data, only the leaf node and the corresponding hash links leading to the root need to be checked, reducing the amount of data that needs to be examined.
In the Semaphore protocol, Merkle trees are used to keep track of the members of a group in the protocol. When a user joins a group in Semaphore, their public identity commitment is added to that group's Merkle tree. This allows the protocol to check that the user is a member of the group without revealing their identity.
Merkle Witness
A Merkle witness is a small piece of data that can be used to prove the authenticity of a larger piece of data. Specifically, they are a set of values that are used to prove the authenticity of a particular leaf node in a Merkle tree. The witness includes the leaf value and the values of the hashes in the path from the leaf node to the root of the tree. The authenticity of the leaf node is proven by recomputing the hashes along the path and comparing them to the included witness values.
RLN
RLN (Rate-Limiting Nullifier) is a ZK gadget or mechanism that enables spam prevention for anonymous environments.
Anonymity opens up the possibility for spam and Sybil attack vectors for certain applications, which could seriously degrade the user experience and the overall functioning of the application. For example, imagine a chat application where users are anonymous. Now, everyone can write an unlimited number of spam messages, but we don't have the ability to kick this member because the spammer is anonymous.
RLN helps us identify and "kick" the spammer. Moreover, RLN can be used to limit users in the number of actions they are allowed to make within a given timeframe.
Semaphore Protocol
CryptKeeper can be thought of as a browser extension for Semaphore, allowing users to use basic Semaphore functions separately from the app layer.
Semaphore is a zero-knowledge protocol that allows you to cast a signal (for example, a vote or endorsement) as a provable group member without revealing your identity. Additionally, it provides a simple mechanism to prevent double-signaling.
With Semaphore, you can allow your users to do the following:
- Create a Semaphore identity.
- Add their Semaphore identity to a group (i.e. Merkle tree).
- Send a verifiable, anonymous signal (e.g a vote or endorsement).
Semaphore Identities
A Semaphore identity is an object that is used to join a Semaphore group. It contains two private values that are generated when the identity is created: an `identity trapdoor` and an `identity nullifier`. These values are kept secret by the identity owner and are used to generate ZK proofs and authenticate signals.
The identity also has a public value called the "identity commitment", which is similar to a public Ethereum address and is used to represent the identity of a group member. Identities can be created randomly or deterministically from a secret message and can be saved and reused later as a JSON string.
Semaphore proofs
A Semaphore proof is a zero-knowledge proof that is used to anonymously signal a message from within a Semaphore group. The proof is generated by passing in a user's Semaphore identity, the group the user belongs to, an external nullifier to prevent double-signaling, and the message the user wants to send.
Developers can use Semaphore for the following:
Trusted setup
A trusted setup is a procedure in which secret information is used to generate a piece of data that is necessary for the proper functioning of certain cryptographic protocols. This data, once generated, is then made public and the secret information used to generate it is discarded, so that no further participation from the creators of the ceremony is required.
The trust in a trusted setup comes from the fact that only a minimum number of honest people need participate in the ceremony in order to ensure the security of the final output. Trusted setups can have a 1-of-N trust model where only one honest participant is required out of a group.
Learn more about trusted setups in here: https://vitalik.ca/general/2022/03/14/trustedsetup.html
Verify the files from Semaphore’s trusted setup ceremony.